哈希表 (hash table) 相关的概念就不再罗列了,它的相关知识可参见 维基百科。
Nginx 使用哈希表加速静态 (进程初始化完成后就固定不变的数据) 数据集的访问速度, 为了减少复杂性,Nginx 并未实现哈希表的插入、更新和删除操作,而只提供了查找功能 (和有限的模糊查找功能)。
同时,Nginx 使用单独链表 (separate chaining) 机制处理哈希表碰撞 (hash collision) 的情况 (实际上,Nginx 使用数组结构实现单独链表,Separate chaining with static array)。
另外,由于 Nginx 哈希表的 “只读” 特性,在它创建和初始化时 Nginx 就能够根据哈希
表要管理的静态数据集大小、每个数据项的长度、相关配置指令 (*_bucket_size 和
*_max_size) 和 一些系统参数 (CPU Cacheline) 等因素使用尽量小的内存来创建哈希
表。
结构体和函数
-
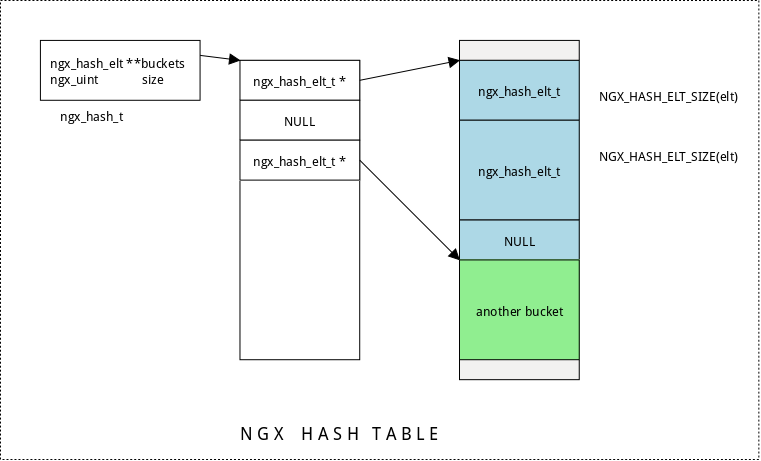
ngx_hash_t- 哈希表typedef struct { ngx_hash_elt_t **buckets; /* 用于存储各个 bucket 的内存地址 */ ngx_uint_t size; /* 哈希表大小,即 bucket 个数 */ } ngx_hash_t; -
ngx_hash_elt_t- 哈希表节点。一个 bucket 可以存储多个具有相同hash值的节 点。typedef struct { void *value; /* 值 */ u_short len; /* key 长度 */ u_char name[1]; /* key 起始地址 */ } ngx_hash_elt_t; -
NGX_HASH_ELT_SIZE(name)- 用于计算哈希表节点 (ngx_hash_elt_t) 占用内存空 间的宏,为了提高内存访问速度,对节点内存使用sizeof(void *)进行了对齐 (下面 定义中的2为用于表示 key 长度的len成员占用内存,是否换成sizeof(u_short)更合适,毕间u_short在 32/64 位机上占用 2 个字节内存,并不是 C 标准的规定)。#define NGX_HASH_ELT_SIZE(name) (sizeof(void *) + ngx_align((name->key.len + 2, sizeof(void *))) -
ngx_hash_key_t- 哈希表原始节点信息。作为构造哈希表的入数据,其中的数据用 于生成哈希表节点ngx_hash_elt_t。typedef struct { ngx_str_t key; ngx_uint_t key_hash; void *value; } ngx_hash_key_t; -
ngx_hash_init_t- 存储用于创建哈希表的参数和内存池,即最终哈希表的存储位置。typedef struct { ngx_hash_t *hash; ngx_hash_key_pt key; ngx_uint_t max_size; ngx_uint_t bucket_size; char *name; ngx_pool_t *pool; ngx_pool_t *temp_pool; } ngx_hash_init_t; -
ngx_hash_add_key- 此函数用于构造哈希表的输入数据ngx_hash_keys_arrays_t结构体。详细使用方法可参见函数ngx_http_server_names代码。 -
ngx_hash_key- Nginx 使用 BKDR 哈希算法计算字符串 key 的哈希值。#define ngx_hash(key, c) ((ngx_uint_t) key * 31 + c)
创建
哈希表创建和初始化工作由 ngx_hash_init 完成。为了叙述更具体化,这里选取请求包
头的哈希表构造作为例子:
/* ngx_http_init_headers_in_hash */
ngx_array_t         headers_in;
ngx_hash_key_t      *hk;
ngx_hash_init_t     hash;
ngx_http_header_t   *header;

ngx_array_init(&headers_in, cf->temp_pool, 32, sizeof(ngx_hash_key_t));

for (header = ngx_http_headers_in; header->name.len; header++) {
    hk = ngx_array_push(&headers_in);
    ...
    hk->key = header->name;
    hk->key_hash = ngx_hash_key_lc(header->name.data, header->name.len);
    hk->value = header;
}

hash.hash = &cmcf->headers_in_hash;
hash.key = ngx_hash_key_lc;
hash.max_size = 512;
hash.bucket_size = ngx_align(64, ngx_cacheline_size);
...
ngx_hash_init(&hash, headers_in.elts, headers_in.nelts);
对上述代码的补充说明:
-
ngx_http_init_headers_in_hash函数对 Nginx 能够识别的请求包头 (定义于ngx_http_headers_in数组中) 构造哈希表,以便在请求包头处理过程中,快速从ngx_http_headers_in中找到包头的处理函数。 -
调用
ngx_hash_init创建哈希表前,需要将哈希表节点转换成ngx_hash_key_t类型。此函数使用了从temp_pool内存池申请的数组headers_in来存储这些中转 数据。 -
bucket_size默认为 64,然后与ngx_cacheline_size(根据不同的 CPU,该值可 能为 32, 64, 128 个字节) 进行对齐,以减少在 bucket 内查找时内存的读取次数。 -
最终生成的哈希表保存在
cmcf->headers_in_hash中。
哈希表要存储的数据和相关配置准备就绪后,调用 ngx_hash_init 函数开始实际的哈希
表创建过程,这个函数主要完成以下几件主要工作:
-
检查
bucket_size参数是否合适 (通过验证当前bucket_size大小的 bucket 能 否存得下任一个节点数据和 bucket 结束标志位void *):for (n = 0; n < nelts; n++) { if (hinit->bucket_size < NGX_HASH_ELT_SIZE(&names[n]) + sizeof(void *)) { ... return NGX_ERROR; } } -
分配用于 测试并选择合适的哈希表大小 的 跟踪数组;计算出能够存储下
nelts个 节点的最小 哈希表 大小,后续会以这个值为基础,选择更合适的值:test = ngx_alloc(hint->max_size * sizeof(u_short), hinit->pool->log); /* 可实际用于存储哈希节点的空间,void * 为 bucket 结束标识 */ bucket_size = hinit->bucket_size - sizeof(void *); /* `ngx_hash_elt_t` 最小占用 2 * sizeof (void *) 个字节:比如 key 的长 度小于等于两个字节时,根据结构体对齐规则,这个结构体会按 (void *) 类 型长度对齐;那么 bucket_size / (2 * sizeof(void *)) 即表示可以用一个 bucket 保存的 `ngx_hash_elt_t` 个数;最后结果表示 `nelts` 个节点最少 需要使用 `start` 个 bucket 才能存得下 */ start = nelts / (bucket_size / (2 * sizeof(void *))); start = start ? start : 1; -
测试并选择合适的哈希表大小。
test跟踪数组的元素保存了对应的 bucket 在存储了 属于该 bucket 的节点后 总共占用的空间大小 (这个过程的依据是:哈希表越大,在理想 情况下,分配到每个 bucket 的节点就越少):for (size = start; size < hint->max_size; size++) { ngx_memzero(start, size * sizeof(u_short)); for (n = 0; n < nelts; n++) { ... key = names[n].key_hash % size; test[key] = (u_short) (test[key] + NGX_HASH_ELT_SIZE(&names[n])); if (test[key] > (u_short) bucket_size) { goto next; } } goto found; next: continue; } -
根据上一步得到的最佳哈希表大小,再次使用
test累计并保存每个 bucket 最终占 用的空间大小 (按需分配)。为了提高访问速度,每个 bucket 的大小依据会与ngx_cacheline_size进行对齐:for (i = 0; i < size; i++) { test[i] = sizeof(void *); } for (n = 0; n < nelts; n++) { ... key = names[n].key_hash % size; test[key] = (u_short) (test[key] + NGX_HASH_ELT_SIZE(&names[n])); } len = 0; /* 保存所有 buckets 最终需要占用的内存空间 */ for (i = 0; i < size; i++) { ... test[i] = (u_short) (ngx_align(test[i], ngx_cacheline_size)); len += test[i]; } -
为哈希表分配 bucket 空间和 bucket 地址数组 (数组元素是指向对应 bucket 内存块 的指针或者NULL (对应 bucket 无数据)),并且保证 bucket 空间起始地址与
ngx_cacheline_size对齐:buckets = ngx_pcalloc(hinit->pool, size * sizeof(ngx_hash_elt_t *)); elts = ngx_palloc(hinit->pool, len + ngx_cacheline_size); elts = ngx_align_ptr(elts, ngx_cacheline_size); -
将 bucket 地址数组和 对应 bucket 进行关联:
for (i = 0; i < size; i++) { ... buckets[i] = (ngx_hash_elt_t *) elts; elts += test[i]; } -
将
ngx_hash_key_t类型数据转换成ngx_hash_elt_t并存储到 bucket 中 (此时test数组用于保存对应 bucket 已经使用的空间字节数:for (i = 0; i < size; i++) { test[i] = 0; } for (n = 0; n < nelts; n++) { ... key = names[n].key_hash % size; elt = (ngx_hash_elt_t *) ((u_char *) buckets[key] + test[key]); elt->value = names[n].value; elt->len = (u_short) names[n].key.len; ngx_strlow(elt->name, names[n].key.data, names[n].key.len); test[key] = (u_short) (test[key] + NGX_HASH_ELT_SIZE(&names[n])); } -
节点数据存储完毕后,给各个 bucket 区域增加结束标记 (
ngx_hash_elt_t::value是每个节点的第一个元素,并且是void *类型,那么最后一个用于存储结束标记的void *空间可以通用elt->value引用):for (i = 0; i < size; i++) { if (buckets[i] == NULL) { continue; } elt = (ngx_hash_elt_t *) ((u_char *) buckets[i] + test[i])); elt->value = NULL; } -
最后的整理,临时空间该释放的释放,并给哈希表字段赋值:
ngx_free(test);

hinit->hash->buckets = buckets;
hinit->hash->size = size;
完成上述一系列工作 (ngx_hash_init) 后,整个 “只读” 哈希表就创建完成了。此时
哈希表的大致结构图如下:
查找
哈希表的查找操作相对来说,要简单很多,只要对哈希表的存储结果有了正确认识,查找 过程就很容易理解:
void *
ngx_hash_find(ngx_hash_t *hash, ngx_uint_t key, u_char *name, size_t len)
{
    ...
    ngx_hash_elt_t *elt;

    elt = hash->buckets[key % hash->size];

    if (elt == NULL) {
        return NULL;
    }

    while (elt->value) {
        if (len != (size_t) elt->len) {
            goto next;
        }

        for (i = 0; i < len; i++) {
            if (name[i] != elt[name[i]) {
                goto next;
            }
        }

        return elt->value;

    next:

        elt = (ngx_hash_elt_t *) ngx_align_ptr(&elt->name[0] + elt->len,
                                               sizeof(void *));
        continue;
    }

    return NULL;
}
对上述代码的补充说明:
-
某个 bucket 无节点数据时,对应的 bucket 地址元素值为
NULL。 -
使用
ngx_align_ptr(&elt->name[0] + elt->len, sizeof(void *))计算出同一个 bucket 中下一个节点的超始地址。
Comments
不要轻轻地离开我,请留下点什么...